Here we’ll instruct you on how to install a two-stroke bicycle engine kit on a bike. Now, before we even start, it's important to know what you're getting into and what you need to make sure installation goes as smooth as possible.
First things first- The Bike:
Even though the engine kit is made to be as universal as possible a few key features your bike should have will make installation a lot easier:
- Your bike needs to be a standard male beach cruiser, road or hardtail mountain bike.
- The tubes should be 25 to 28mm in diameter with an open “V” style frame
- The frame should also have 9-11 inch of clearance between the bottom bracket and top bar.
- These kits will fit most 26”x 1.75” wheel with a standard 12 or 14 gauge 36 count spoke
- If you're in these right specifications then you're good to go!
Sprocket and Wheel Clamp Assembly:
Most sprocket clamp assemblies come with 9 bolts and nuts, two rubber grommets, and a single pair of metal plates (though some engine kits may have two). Most clamp assemblies come with 10mm bolts and studs, so you’ll need a socket wrench to complete this part of the installation. If you’re using a coaster brake, first start by removing the coaster brake arm (be careful not to accidentally disassemble the entire axle).
- Cut a straight line in between two of the holes on one of grommets (not both)
- Thread the grommet through the wheel around the hub (Note: Make sure the grommet holes are between the spokes, not blocking them)
- Take the metal plates from your assembly and align them on top of the grommet inside of the wheel, then align the sprocket with the grommets to make sure the spokes and grommet holes are aligned
- Starting from the inside of the wheel, send each bolt through the grommet and sprocket, and torque them down (Note: It will help to torque them in a star-shaped pattern)
Once you’re done tightening down the sprocket and clamp assembly, put the wheel on the bike and bolt it down with good tension on the bicycle chain. Note: We highly recommend using caliper or disc brakes even if you have a coaster brake wheel. Because of the speed you’ll be getting up to, you’ll want to be sure to have additional stopping power than a coaster brake.
Mounting the Engine:
Mounting the engine is a pretty easy procedure, but if your frame’s not as described above, there are a few things you’re going to need to install before you mount the motor. If you’re using a u-mount and/or vibration motor mounts to compensate for a larger downtube and/or seat tube, you’ll first need to remove the motor mount studs in your engine. Some riders use a stud extractor, but there’s an easy way to get those particular studs out:
the two bolt method.
- Thread a nut on to one of the studs, then thread another nut above the first
- Tighten the nuts down as tight as possible between the two
- Torque the bottom nut, and eventually, you’ll be able to remove the studs.
To install the u-mount:
- Remove your front motor mount and motor mount bracket
- Place the mount plate on to the engine over the empty motor mount stud ports
- Mount the two standing bolts into the motor mount stud ports
To install vibration motor mounts:
- Remove your motor mounts and motor mount brackets
- Use the studs that came with the new mounts to fill in the motor mount stud ports
- Slide the original motor mount back on to the studs, then the vibration motor mount on top of that
When those parts are installed, you can install the motor mount stud nuts. Once everything is ready to mount, then mount the engine on to your bike
Installing Your Clutch:
The parts of your clutch (for installation purposes) are your clutch cable, clutch lever, clutch spring, and the heat shield spring.
- Take your stock handlebar grips off the handlebars, and slip on the clutch lever
- Install the clutch cable in to the clutch lever (the beaded end should go in to the lever socket- just like installing a brake cable), then tighten it down
- Slide the heat shield spring over the opposite end of the cable, and slide the wire through the clutch base screw
- Slide the clutch spring over the wire, then slide the wire through the clutch arm on the engine (Note: loosen the clutch arm screw before sending the wire through the clutch arm)
- Align the clutch arm so it’s flush with the engine (i.e. it points straight back), tighten the tension of the clutch cable so it stays, then tighten down the clutch arm screw
With your clutch arm pulled in, you can pedal your bike like normal because the engine’s disengaged. Once you release the clutch lever, your engine will engage.
Chain Installation:
For easier installation of the chain, start by removing the clutch case cover (along with the clutch plate) and the drive sprocket case cover. Doing this will help the drive sprocket and clutch spin with ease. Then remove the master link from your chain
- Measure the chain on the rear and front sprockets, then remove any unnecessary links (you’ll need a motorcycle chain breaker to remove links). Note: you’ll want to leave .5” of slack on the chain so that it doesn’t snap
- Reinstall the master link
- Reinstall the case covers and components
- Install the pulley on your rear fork, and put the bottom portion of the chain on top of the plastic idle wheel
- Align the chain so that the top and bottom portions of the chain run along a straight path. If the chain is not straight it can slip off the sprockets and damage your spokes (and even you, if you’re not careful)
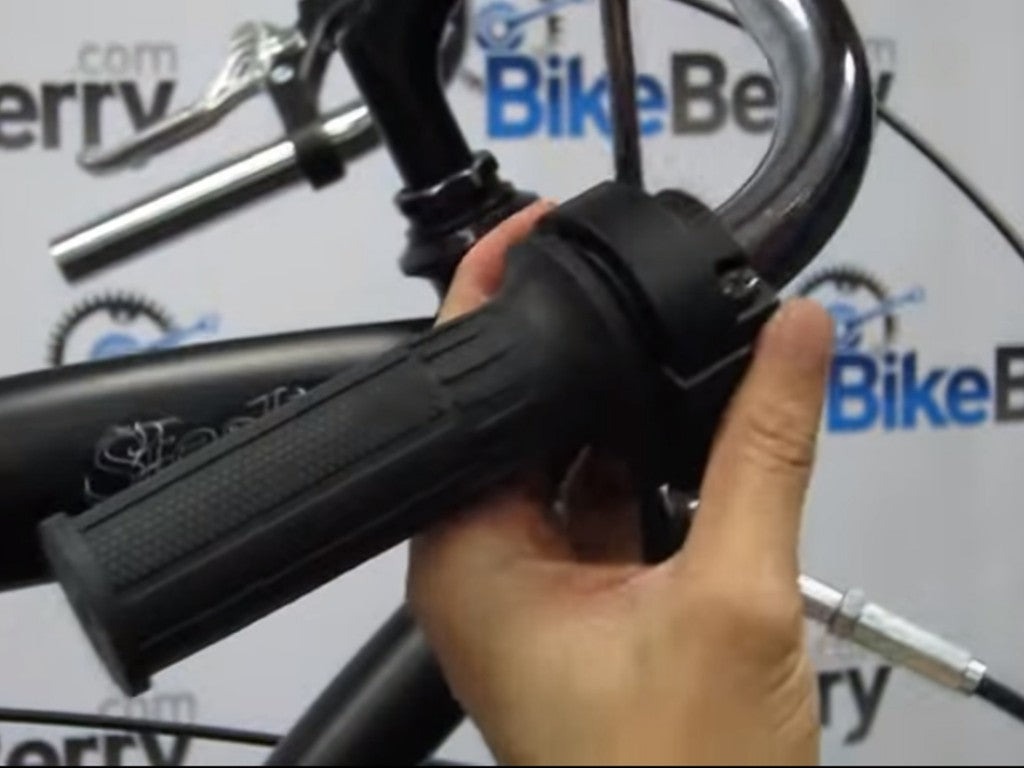
Throttle Installation:
Start by dry fitting the throttle handle and kill switch on your handlebars, then mark where you’ll need to drill a ¼” hole into the handlebar.
- Thread the “L” bracket end of the throttle cable into your kill switch housing
- Slide the beaded end of the cable in to the cable port in the throttle grip
- Insert the grip in to the kill switch housing, then slip the grip on to the handle bars
- Line the pin from the top of the kill switch to the port you drilled, then screw the top and bottom portions of the kill switch together, forming your throttle and kill switch assembly
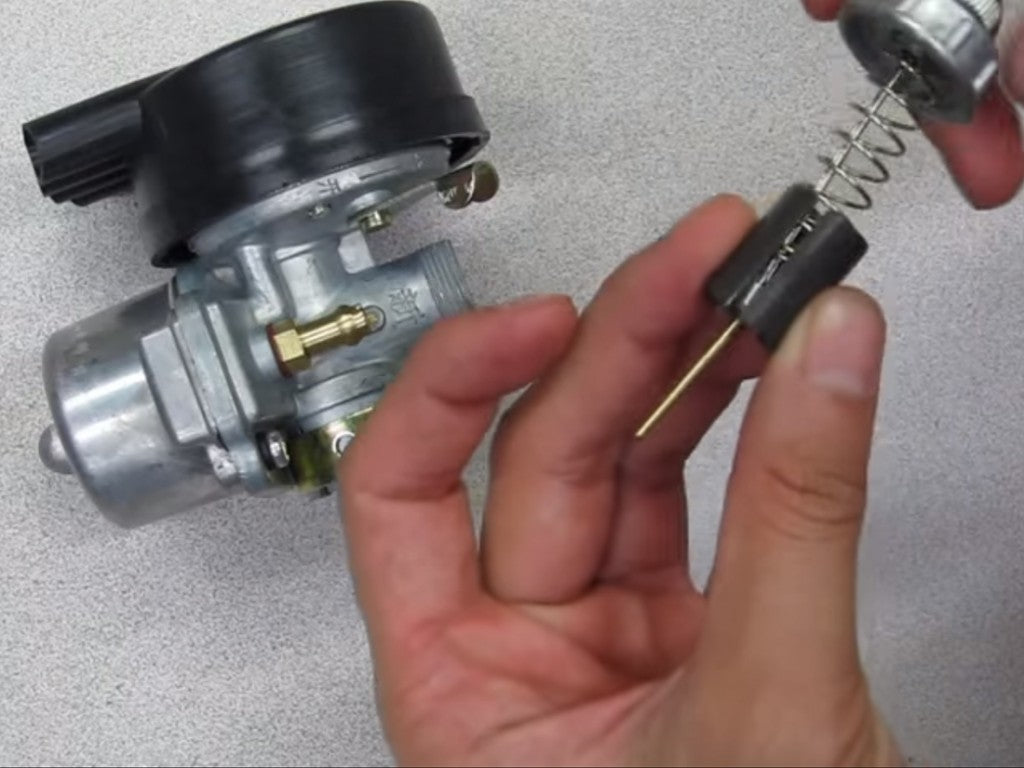
Carburetor Installation:
Start by going to the carburetor and removing the bottom end of the carburetor and remove the screw top, spring, plunger, jet needle (with c-clip attached), and the “e” washer.
- Start by now inserting the jet needle in to the plunger, then the “e” clip above that
- Stand the spring up in the plunger, then press down the screw top down on to the spring, which will compress the throttle components
- Thread the end of the throttle cable through the screw top, and in to the plunger
- Send the beaded end of the throttle cable into the small port of the plunger (not the jet needle port), install, and let it go
- Insert your new throttle assembly back in to your carburetor. Note: Do not force the plunger into the carburetor. If it does not easily slide in, this is a sign that it’s not aligned within the carburetor. Slowly turn the cable until you feel the plunger easily drop down into the carb
- Screw the screw top back on
- Loosen carburetor mounting clamps, slide the carburetor over the manifold, tighten it around the manifold, and align the carburetor so that the throttle cable is pointed up and the float bowl is level with the ground
Electrical Wiring
There are four components to your electric wiring: the magneto, the CDI, kill switch, and the spark plug. The spark plug, magneto, and kill switch are already installed, so all you need to install in the CDI. You can mount the CDI anywhere on your frame, as long as it’s close enough to the spark plug to connect to it. Now that everything is ready to wire, let’s get down to it:
- Connect the black wire from the CDI to the black wire from the magneto, and the green wire from the kill switch. These are your ground wires that will complete the circuit
- Connect the blue wire from the CDI to the blue wire on the magneto, and the yellow/red wire from the kill switch
Note: kill switch wiring coloring will vary between engines and engine suppliers. These colors may not be your colors, but as long as you know which ground wires you have it’s only a process of elimination where your other wires are.
The Rest of Your Bike: Now it’s time to install the rest of those components.
- Install the muffler on to the front of the motor head (opposite of the carburetor)
- Install the gas tank
- Line the tank up with the top bar, align the gas tank brackets under that bar, and fasten the tank to the bike
- Install the fuel valve in to the gas tank, connect the fuel line to the carburetor’s fuel jet, and connect the fuel line to the fuel valve
- To install the chain guard, slide the guard’s front bolt port over the long screw behind your drive sprocket case cover, then fasten it with a nut. Then use a zip-tie to fasten the other end to the frame (Do not let this interfere with the chain)
CONGRATULATIONS- You just installed your bike engine kit! Before riding, we recommend using a ratio of 6 oz to 1 gallon to break your motor in, then 4-5oz to 1gallon after the motor is broken in. However, engines may vary, so consult the manufacturer for their recommended oil ratios.
Want to see this bike being put together? Check out the installation of this two strong engine kit on our
Youtube video here


24 comments
Danny Hosey
Thanks,I learned a few things and refreshed on a few.But I’ll want to come back to this from time to time.Thanks again and God Bless
Eric Matson
“Great site
Lots of very usefull info
I’m good at putting things
together
Your ass. Instructions made things quicker
Oh by the way l enjoy your videos on you tube by Allex”
Joshua
Hi, just checking in and wanted to thank you guys for the great info. You’ve provided.
BikeBerry
“Hello Anne,
The best way to determine if it is going to work our not is to check out our <a href=""https://www.youtube.com/watch?v=NR8-IcrbwaI&t=103s"" target=""_blank"" rel=""noopener noreferrer nofollow"">How to See if an Engine Kit Will Fit on Your Bike (2-Stroke & 4-Stroke) Video. This will determine if you have the right measurements to fit an engine kit on your bicycle."
BikeBerry
“Hey Travis!
Great Question!
For the <a href=""https://www.BikeBerry/gas-engine-kits/2-stroke-race-engines.html"" target=""_blank"" rel=""noopener noreferrer nofollow"">BBR Tuning 66/80cc Racing Series Engine Kits we would always advise breaking the engine in with the stock parts first, after your first 4 tanks we would then switch over to the high performance parts for the best results."
BikeBerry
“Hey James!
What we usually do is mount the gas tank over the top of the frame. With the extra wiring, we zip tie the wiring to the frame of the bicycle for a more clean and neat set up."
BikeBerry
“Great question Mel!
We would recommend using the manufactured 2 Stroke Synthetic oil which will be <a href=""https://www.BikeBerry/maxima-scooter-pro-2-stroke-synthetic-motor-oil-1-liter.html"" target=""_blank"" rel=""noopener noreferrer nofollow"">Maxima Scooter Pro 2-Stroke Synthetic Motor Oil 1 Liter"
BikeBerry
“Hey Aaron,
We believe you are referring to the ”“https://www.BikeBerry/drive-sprocket-removal-tool.html”" target=""_blank"" rel=""noopener noreferrer nofollow"">Drive Sprocket Removal Tool. This is used to secure the nut on the drive sprocket or to remove the nut for replacement."
Anne M.
Hi, i have a 26 in. Roadmaster women’s bike and want to install a motor kit from Walmart. My question is can i do this with my bike because there’no top bar like on men’s bikes? Can you please help me? Thanks
Travis Herget
Hello everyone, I purchased a new 66/80 cc motor and a high compression head for it along with a few other high performance parts. But my question is: Should I break in the motor with the stock head? Or with the high compression head? I’m not sure if everything will seat correctly or not. Please let me know what your thoughts are. Thank you.
BikeBerry
“Hello Fred,
We do not have a schematic for the Huffy Davidson Lighting CDI. However, we do have our video installation for you <a href=""https://youtu.be/8kM3g7E8uE8"" target=""_blank"" rel=""noopener noreferrer nofollow"">here. Hope this helps!"
Nathan
Hi, I’ve purchased a 80cc kit about 2 months ago and installed it the way I was instructed by your videos and it helped me quite a bit i can use more information like this though.
James
“I am a novice mechanic at best, but I am very interested in installing a motor on my 26”" mountain bike. I’m trying to figure out whether or not I am equal to the task or if I should hire a professional. My thought is that since there would be on going maintenance, that it would be beneficial to install it myself.
Although I’m interested in going fast, the low maintenance aspect of a friction drive motor is appealing.
I also wonder about the available engine kits out there. It seems that, at least in the budget range, that they don’t seem to fit the bike quite as well as they purport and/or the parts aren’t quality parts. However, there’s no way my wife will ever let me invest in this if I can’t keep this project cheap. I saw an idea for putting a chainsaw motor on a bike, which is intriguing.
Anyway, I apologize for the long email but my personal research has only gotten me so far. "
Mel
What kind of oil do you use?
Chuck
Master link clips MUST be installed with the closed end facing the direction of normal chain movement. Otherwise a power pulse can pop the clip off. It definitely happens.
Mug
It was not as bad as i thought it was going, to be honest, i am not too good with a tool but this was easy.
Aaron Kern
What is the treaded black metal type plug thing that comes with the 2stroke
Fred J Rabe
Do you have any schematic’s for The huffydavison lighting CDI.
BikeBerry
“Sorry about that, Paul!
Fuel filters are one of those parts that some riders use, and most riders don’t. We recommend using them, so thank you for asking us about them. Installation is pretty easy:
First make sure your fuel is turned off and there’s none in the fuel line because you’re going to cut it in half.
Make a cut in the center of the fuel line and separate it in to two halves: one coming from the gas tank and one coming from the carburetor.
Take one end of the fuel filter and install it in to the fuel line coming from the gas tank. Install the other end of the fuel filter in to the fuel line coming from the carburetor, and you’re ready to ride!”
BikeBerry
“Electrical wiring can be a little tricky because from time to time manufacturers will change up the colors on the wires. First, make sure you’re wiring all of your wires copper-on-copper (this means you’ll need to take off the connectors, peel the plastic housing back, and connect the wires together). After you’ve done that, here’s how to wire everything properly:
The black wires from the CDI, magneto, and kill switch are connected together. After they’re wired together you’ll want to make sure they’re ground somewhere on the frame without paint in order to get good connectivity.
The red wire from the kill switch goes connected to the blue wire from the CDI and the blue wire from the magneto. Once all of those are connected, you can either tuck the white wire back in to case or connect a very low voltage light to it (around the 1-2v range)”
BikeBerry
“Hey there, Glenn! When it comes to 4-strokes, you probably already know that they have lots of torque. All of that torque will put stress on that chain, so you’ll want the strongest chain you can get. I recommend using the replacement master link first before trying anything else. If you still have issues with the master link you may want to try upgrading the master link by finding a comparable one from a motorcycle or scooter shop.
What you want to avoid, however, is taking the master link out all together. If you replace the master link with a regular link and that link breaks, replacing that link may require you to break the link before and after it. You could get away with using a ”“http://www.BikeBerry/415-half-link.html”" rel=""nofollow"">Half Link, but remember that you want to use this as a last resort. You’ll only want to use the right parts for the right job, so if you’re replacing the master link it’s best to replace it with a master link. If you cannot find a new master link, a half link can do in a pinch, but avoid installing a spare link or completing the chain without a master link."
paul
I dont see where the fuel filter goes anywhere in these instructions or your video. Help?
Jacob
“We have a black and a red wire coming out of our killswitch and a blue, black and white wire coming out of our magneto and a blue and black cable coming out of our CDI. Like you stated above we Connected the black wire from the CDI to the black wire from the magneto, but we don’t have a green wire from the kill switch. We have a red wire.
We did connect the blue wire from the CDI to the blue wire on the magneto, but we do not have a yellow/red wire from the kill switch. We have a red and black wire. What connects to what since we don’t have the colors you indicated? Last question, where does the white wire coming out of the magneto go?”
Glenn Larew
After about 40 miles of use, the sprocket drive chain master link keeper broke releasing the chain. I am trying to decide whether to install my spare master link or try to find a pin press to eliminate the master link. This is a 4 stroke bike.